Sunday, November 14, 2010

TomTom v.1.5 with complete maps of USA, Canada, Mexico v.855.2934 for iPhone 4 (2010)

  • TomTom v.1.5 with complete maps of USA, Canada, Mexico v.855.2934 for iPhone 4 (2010)
    TomTom v.1.5 with complete maps of USA, Canada, Mexico v.855.2934 for iPhone 4 (2010) | 1.81 GB

    New version of TomTom has improved user interface that is optimized for the iPhone 4. The revitalization of users can view the cartographic materials with high resolution. In addition, added a new navigation function to the photo. The function allows you to retrieve photos from geotagging location coordinates and plot a route to it.

    Year: 2010
    Software version: 1.5
    Revision cards: 855.2934
    Developer: TomTom
    System Requirements: iPhone 4 iOS 4.1 Jailbreak
    Language: Multilingual (Russian present)
    Crack: Not required (cured)

    Key features:
    * IQ Routs: Uses knowledge of millions of drivers for the most rapid promotion at any time;
    * HD traffic: the best information on the movement of passing the tube and precision of the time booked arrival at destination (application fee);
    * ALG;
    * Search on Google;
    * Auto-day and night;
    * Ability to rotate the screen portrait and the book;
    * Mute the music during voice prompts;
    * Save the navigation during telephone calls;
    * Speed cameras and more.

    Changes in new version:
    * Coverage. Detailed map covering 99.9 percent of the U.S., Canada and Mexico
    * Map is optimized for the iPhone 4. Improved graphics resolution, clear maps. Menu with improved sensitivity to touching, more accurate positioning, even in conditions of aggravated receiving GPS.
    * Browse photos. Collect GPS location where the photo you want to go and TomTom will take you there!
    * The new updated map. Because the roads during the year vary on average by 15 percent, applications TomToma go to the most recent cards, ready to navigate. Do not need mobile connection or relationship with these Internet to view the map and a route to your destination.


    Download
    http://hotfile.com/dl/82292570/9e295a0/Tom1.5.part01.rar.html
    http://hotfile.com/dl/82292569/3848773/Tom1.5.part02.rar.html
    http://hotfile.com/dl/82292882/7b973e4/Tom1.5.part03.rar.html
    http://hotfile.com/dl/82292897/ec80aae/Tom1.5.part04.rar.html
    http://hotfile.com/dl/82293054/9a7ef65/Tom1.5.part05.rar.html
    http://hotfile.com/dl/82293067/481b5a2/Tom1.5.part06.rar.html
    http://hotfile.com/dl/82293209/683c429/Tom1.5.part07.rar.html
    http://hotfile.com/dl/82293222/4ff4076/Tom1.5.part08.rar.html
    http://hotfile.com/dl/82293372/c31a9ab/Tom1.5.part09.rar.html
    http://hotfile.com/dl/82293391/bbb6e61/Tom1.5.part10.rar.html
    http://hotfile.com/dl/82293570/e27e904/Tom1.5.part11.rar.html
    http://hotfile.com/dl/82293574/2afccf5/Tom1.5.part12.rar.html
    http://hotfile.com/dl/82293748/116782f/Tom1.5.part13.rar.html

    http://www.fileserve.com/file/5HyyS8A
    http://www.fileserve.com/file/4sakfUS
    http://www.fileserve.com/file/dXjHNtW
    http://www.fileserve.com/file/7yuvxGh
    http://www.fileserve.com/file/6hgpHvu
    http://www.fileserve.com/file/D5BVRgK
    http://www.fileserve.com/file/AkUfQgb
    http://www.fileserve.com/file/m75xwmE
    http://www.fileserve.com/file/hHmzvrs
    http://www.fileserve.com/file/ThV4eCc
    http://www.fileserve.com/file/dcfq4E3
    http://www.fileserve.com/file/BScUGGd
    http://www.fileserve.com/file/BH4QwCx

    http://uploading.com/files/db8b265d/Tom1.5.part01.rar/,
    http://uploading.com/files/87e77m8m/Tom1.5.part02.rar/,
    http://uploading.com/files/8m4387cc/Tom1.5.part03.rar/,
    http://uploading.com/files/ce771baa/Tom1.5.part04.rar/,
    http://uploading.com/files/796565c3/Tom1.5.part05.rar/,
    http://uploading.com/files/983b33m2/Tom1.5.part06.rar/,
    http://uploading.com/files/44m246f6/Tom1.5.part07.rar/,
    http://uploading.com/files/2d89am5f/Tom1.5.part08.rar/,
    http://uploading.com/files/66c864db/Tom1.5.part09.rar/,
    http://uploading.com/files/8b7dae2c/Tom1.5.part10.rar/,
    http://uploading.com/files/d7cb7223/Tom1.5.part11.rar/,
    http://uploading.com/files/96743f94/Tom1.5.part12.rar/,
    http://uploading.com/files/79334m7a/Tom1.5.part13.rar/,

    http://www.filesonic.com/file/31857003/Tom1.5.part01.rar
    http://www.filesonic.com/file/31856885/Tom1.5.part02.rar
    http://www.filesonic.com/file/31857019/Tom1.5.part03.rar
    http://www.filesonic.com/file/31857027/Tom1.5.part04.rar
    http://www.filesonic.com/file/31857579/Tom1.5.part05.rar
    http://www.filesonic.com/file/31857611/Tom1.5.part06.rar
    http://www.filesonic.com/file/31857739/Tom1.5.part07.rar
    http://www.filesonic.com/file/31858013/Tom1.5.part08.rar
    http://www.filesonic.com/file/31857879/Tom1.5.part09.rar
    http://www.filesonic.com/file/31857893/Tom1.5.part10.rar
    http://www.filesonic.com/file/31858081/Tom1.5.part11.rar
    http://www.filesonic.com/file/31858127/Tom1.5.part12.rar
    http://www.filesonic.com/file/31858417/Tom1.5.part13.rar

Pwnage Guide


Note: Pwnage is MAC only. Pwnage does not work on the following devices:
iPhone 3gs later than week 40 2009 manufacturing date (look at your serial number. Digit 3 is the year, digits 4 and 5 are the weeks. xx940xxxxxx serial means 2009 week 40. xx002xxxx means 2010 week 2.


iPod touch 2nd/3rd generation devices cannot be pwned currently.
Use spirit for the above devices.
Pwnage 3.1.5 is out. This guide is for the MAC version of pwnage. Here are the steps to pwning your phone. Pwnage for the MAC can be downloaded from here. The required bootloader files can be found here.
Step 1: If your firmware is lower than 1.1.4 or you have not jailbroken your device before, restore a fresh 3.1.2 (or 3.1.3 for 2g users). If you are already at 3.1.2 or you have already pwned or jailbroken your device on an older firmware, this is not necessary. You can follow the restore guide for help on restoring in iTunes. Note: you may see “Preparing iPhone software for restore” for a very long time. Could be 10 minutes. This is normal. Don’t panic and stick with it. Note 2: If you get error 1600 you may try restore mode instead of DFU mode. It can be finicky. Try going back and forth from restore to DFU mode.
Step 2: Install the pwnage from the DMG by dragging it to your applications folder. Extract the rar file for the bootloaders and put that in your Documents folder. Load up the pwnage tool. You will see this screen so click away the warning. Note: some folks having problems loading the pwnage tool and the icon just sits there bouncing. You may try clearing your cache by deleting the {your name}/Library/Caches folder and/or /Library/Caches and reboot. You may also try booting into safe mode.

Step 3: At the top, select “Simple Mode” and click the phone or iPod that matches your device.

Step 4: Select the firmware you used to restore your phone in step 1 and click the blue next arrow.

Step 5: (2g unlockers only. 3g/3gs/ipod skips to step 7) Select your bootloaders that you downloaded from step #1. You will be presented a screen asking you if you wish to search the web for the bootloaders. Select NO.

Step 5a: Now select YES you wish to browse for the 3.9 bootloader.


Step 6: Repeat steps 5 for the 4.6 bootloader files.


Step 7: You will be prompted to create a custom FW image now. Select YES unless you have already done so in which case you can select NO. For first time users select YES. If you select NO, you will skip to step 10.

Step 8: You are asked “Are you legit iPhone”. This means do you need to unlock and activate (NO) or do you have a contract carrier like AT&T (YES). Select NO to unlock, YES to not unlock. (Note: if you do not unlock and you do not have a contract carrier, you will be stuck at connect to iTunes screen and will need to repeat this tutorial again). Note: on 2.0.2, this asks if you have a valid contract instead. The premise is the same. If you have a 3g you always want to say “yes” to this since there is no way to unlock. The exception is if you are intending to use a sim adapter.

Step 9: Wait for custom IPSW / custom restore image to be generated. This takes a few minutes. Also, be prepared to enter your password as part of the process.

Step 10: If your iPhone has been pwned before, say YES. Otherwise say NO. Note: if you have restored a generic image, you should say NO. Only say yes if you have pwned and your iPhone boots with the pineapple or custom boot image. If you pwned 1.1.4 or higher or are already jailbroken, you do not have to pwn again. This will pwn your phone. There is no harm in pwning your phone again, so if you’re in doubt go ahead and say NO. Note: if you say “YES” skip to step 13.

Step 11: You are now instructed how to get into DFU mode. These steps are identical to my steps here. Follow the steps and you will be fine. If you get lost or behind just click my link and do it manually. Remember, DFU mode means you will not see anything on your iPhone screen. It will appear as it if is turned off but the computer will see the phone. Note: if you have a new macbook released in 4th quarter 2008, you probably cannot get into DFU mode as Apple prevents this. You have some the easiest is to hook your iPhone to a USB hub and plug that into the mac. The same occurs if you’ve updated to Leopard 10.5.6. You can also try to replace adriver, IOUSBFamily.kext with one from 10.5.5 (instructions to do this are beyond scope of this tutorial).


Step 12: Restore your custom firmware in iTunes. Remember you need to use Option-Restore to select your custom firmware file.

Step 13: Wait for iTunes to finish its restore. This takes a while. Be patient.

Step 14: If you selected “NO” to a legit phone, wait for bootneuter to run and do its thing.

Congratulations. You have a freshly pwned phone. Enjoy Cydia. For a recommendation on what to install, check out this.

RedSn0w Guide


This guide applies to all versions of Redsn0w. The pictures show v0.7 but this hasn’t changed. The guide has been updated for all firmwares.
Redsn0w jailbreak courtesy of Kosovar of thephoneproject, updated June 2, 2010.
Before beginning, please note that redsn0w may be a tethered-jailbreak for some of you users. Tethered-jailbreak means that anytime you reboot your device or your battery runs out, you will need to hook the device back up to the computer and run redsn0w again. (The device will go into recovery mode). Most devices will not be tethered using redsn0w. The following device types are tethered:
  • iPhone 3gs manufactured after week 40 2009. (Look at your serial number in settings, general, about. If digit 3 is not a 9, and digits 4 and 5 are not 40 or less your device is tethered).
  • iPod Touch 3rd generation - is tethered
  • iPod Touch 2nd generation - is only tethered if model # has MC in it.
  • iOS 4.0 devices only iPhone 3g is supported as of this time.
All other devices are not tethered using redsn0w. If your device is tethered, you may wish to use spirit instead. Spirit will result in an untethered jailbreak but requires you iphone users to have activated the device first.
Downloads:
Redsn0w is specific to your firmware. The latest version does not jailbreak all firmware versions. Please download the tool version below based on your firmware or your operating system (MAC vs Windows).
Redsn0w v0.8 (firmware 3.0 & 3.0.1) MAC Windows
Redsn0w v0.9.4 (3.1.2, 3.1.3) MAC Windows
Redsn0w v0.9.5b5-3 (4.0 only iPhone 3g) MAC Windows
NEW –> Redsn0w v0.9.6b1 (4.1 only iPhone 3g) MAC Windows
Firmware 3.1 users, you must update or use another tool like pwnage.
For iPhone 2g unlock (skip if you do not need to unlock): Bootloader 3.9 and 4.6.
Appropriate firmware file. You can get all firmwares from my firmwares link.
(Note screenshots are from a PC, but they are the same as MAC)
Guide:
Step 1) Run redsn0w

Step 2) Press “Browse” and find the correct firmware for your device. You should have downloaded it above because you should have read the needed files section! PLEASE make sure that if you have an iPhone 3G, your firmware should start with iPhone1,2, iphone 3gs firmware starts with iPhone2,_1 and if you have an iPhone 2G it should start with iPhone1,1! This is a big deal, it won’t work without the correct firmware!
Note one more thing. If you are jailbreaking firmware 3.1.3, feed redsn0w firmware 3.1.2. You can download the 3.1.2 firmware file from the firmwares section of this site. (Yes, that’s right. You restored with 3.1.3 but are using 3.1.2 firmware to jailbreak). For all other firmware versions, you should use the firmware that you used to restore.

Click “Open”, and redsn0w will process your firmware. When it is done, it should say “IPSW successfully identified”.
Step 3) On the next screen you will be able to install Cydia, and I suggest you do so. What’s the point of jailbreaking if you can’t install jailbroken apps? (rhetorical =) Note: DO NOT INSTALL ICY. At least at the point of this writing, there seem to be conflicts having both installed and Cydia handles apps better and you will have less problems.
Just hit the next button, and you will see this:

At this point, you want to turn your phone off. Hold the power button until you see the “slide to power off”, and do it!
The next screen wants you to follow a series of instructions that will put your phone in DFU Mode. This will allow redsn0w to perform the jailbreak. You need to do this correctly otherwise it won’t work. If you have any problems, see my DFU mode guide.
  1. Hold down the Power (corner) button for 3 seconds
  2. Without releasing the Power button, push the Home (bottom center) button for 10 seconds
  3. Without releasing the Home button, release the Power button BUT KEEP holding the Home button for 30 seconds.
Once redsn0w starts doing something, you can release the home button on the third step, you don’t have to hold it down for all 30. You’ll KNOW when it happens.
Now your phone will be doing a series of things - and in the end, you will have a jailbroken iPhone! Please comment below with success, failure, and suggestions on the short guide.

Spirit Guide


Spirit is now released. This jailbreaks your iPhone / iPod touch 3.1.2 / 3.1.3 and iPad on 3.2. Here is are the download links for Windows or OSX:

Unlockers note!! (If you dont unlock your iphone and are a subscriber to a legitimate carrier, skip this warning. It does not apply to you). Spirit is not an unlocker. It requires an activated device. This means you iphone users must have a valid iphone sim card. “Slide to unlock” must exist and you must be able to get to icons. Your sim card does not need to be activated with service. It just needs to be a valid card that works in an iphone (such as the AT&T card that came with the device). If you need to unlock, as of this time, there is no 3.1.3 stock unlock for 3g/3gs. 2g users, bootneuter can be used from redsn0w and if you restored an older firmware and unlocked, your unlock will not be gone. If you are on a 3g/3gs and 3.1.2 and need to unlock then: You must not restore stock 3.1.3. This will permanently update your baseband to 5.12 and you are done unlocking for now. To unlock 5.11 baseband, you must install blacksn0w. You can do this in cydia by adding the http://blackra1n.com repository. For 4.xx baseband users, you can use Ultrasn0w by adding the dev team repo: repo666.ultrasn0w.com.
Note: I may make a guide to follow, but this is a very easy jailbreak. Here are the steps:
1) Must be run on clean restored firmware (not currently jailbroken firmware).
2) Hook up the device to the computer
3) Run spirit, click the button.

If you find success please donate something to Comex. (Note: the donations go directly to Comex. Bigboss does not accept donations).
Very important for you 3gs (and newer) users. Once you are done, make sure you load cydia and click “make my life easier” if you do not have an SHSH on file. This allows you to always be able to restore your current firmware, whether apple likes it or not.
Windows users, if you have a problem, run Spirit.exe in compatibility mode:
1) Right click on spirit.exe and select properties
2) Select the compatibility tab and select Windows 98 / ME and check “Run this program in compatibility mode for” box.

After this just click the button.
If you still have a problem:
For those having problems in windows with dl.exe. User DwghtClrk found that if you run spirit in windows 98 / ME mode it works fine. So try this. Also, if you get “You do not have the newest itunes 9.1″ type error and you do have itunes 9.1, it’s likely that you ran blackra1n rc2 and it renamed some of your dll files. Copy itunesmobiledevice.dll to itunesmobiledevice2.dll (so you have the file twice, with both names after). You can find it in C:\Program Files (x86)\Common Files\Apple\Mobile Device Support on win64 or C:\Program Files\Common Files\Apple\Mobile Device Support on win32.

blackra1n Guide


Note 3gs users: If you have a week 41 or newer iPhone you will only be able to have a tethered jailbreak. This means if you have to reboot your iPhone or turn it off then turn it back on (a full reboot, not just standby), you have to rerun blackra1n. You won’t lose all your settings or apps, but you will have to do this everytime you boot. So if you’re iPhone is newer, do not reboot your iPhone for no reason. You can determine your week based on your serial number in settings, general, about. Look the 3rd, 4th, and 5th digits. If it is larger than 940 you will have a tethered jailbreak only.


Note #2 3gs users (take this seriously): Get your shsh stored into cydia ASAP. And make open SSH the first thing you install once you are jailbroken. Do not restore to 3.1.3 under any circumstances. Even if you are not jailbroken, fix your hosts file on all the computers you may ever restore on to use saurik’s server (http://www.saurik.com/id/12#howto). These things are to prevent being in a situation where you cant jailbreak anymore.
Updated for RC3 and sn0w unlock. Screenshots only updated where required.
Geohot has released blackra1n. This is a 3.1.2 jailbreak for all devices: iphone 2g, iphone 3g, iphone 3gs, ipodtouch 1, 2, 3 (note: ipod touch 3 8gb users say this isnt working). It’s pretty easy. You just load the app and click the “make it ra1n” button and follow the prompts. Unfortunately, the ipod 3 and any iphone 3gs after week 41 is tethered which means if you reboot you have to run blackra1n again. (Note for iphone 3gs owners, check your week by looking at the 4 and 5th digits of your serial number).
As of RC3 you can now unlock your 3.1.2 iPhone with the sn0w option!
From geohot: So, what is blackra1n? blackra1n is a 30 second ALL device 3.1.2 jailbreak. Even the ipt3, but the ipt3 is tethered. In order to boot it, just rerun blackra1n. As far as donations go, they are much appreciated, but not until after blackra1n works for you.
To use: load the app and follow the prompts. It’s pretty simple. If you have problems, see troubleshooting section below the last step of the tutorial.
Step 1) Install blackra1n and iTunes 9 or newer.
Step 2) Close itunes and kill iTunesHelper.exe in taskmanager.
Step 3) Attach your device to your computer using the cable, and run blackra1n. You see this:

Step 4a) Hit the “make it ra1n” button. You will see this:

and this

and finally this. This step should only take a couple seconds. If it hangs on running you have itunes helper still running.

Step 4b) Now, watch your iPhone. It will soon show this. When it reboots it is done:

Step 5) Now the jailbreak is done, it’s time to install cydia.
Note: There is plenty of discussion on whats better between cydia, icy, and rock app. I can tell you that Cydia is strongly recommended even if you don’t want to use it. It does everything right and installs a proper BSD base. Rock app is flashy and cool also. The jailbreak install of Rock does not install rock extensions so it is ok to install. The icy install is broken on this jailbreak (version RC1). At this time, I recommend not installing it. It does not get installed with super user permissions and cannot install software properly.
EDIT: ABSOLUTELY DO NOT INSTALL Icy. (Icy removed from RC3 so RC3 users can ignore this). It overwrites dpkg especially if you install it last. Result will be you cannot install mobilesubstrate or anything that depends on it (libhide, sbsettings, categories, etc). This is because a bad Icy bundle was used.
On your device you now have a new icon:

Load this app and select your installer preferences. Remember, we are not skipping cydia, install Rock App if you want also. If you need to unlock, select Sn0w. If you do not need to unlock do not select sn0w.
Note: If you have not activated your device in iTunes, blackra1n will hactivate it for you. If you have a contract carrier, this will not work unless you also unlock. Unlock and hactivation must go together or you will get no service. Here are some rules:
  • If you have activated in iTunes before running blackra1n and have service, you should not select sn0w.
  • If you did not activate in iTunes, blackra1n will hactivate for you. You will not get service via a contract carrier or not without unlocking at this stage. Select Sn0w.
  • If you have a 3g (not a 3gs, but a 3g): If you do not need to unlock now but think you may travel and want to unlock “next month” or something, you should hactivate and unlock by installing sn0w. If you have already activated in iTunes (you have your carrier signal and icons in springboard) you probably need to restore and start over without your sim card inserted. Restore in iTunes, run blackra1n, and select sn0w and let it do the hactivation and unlock. Then insert your carrier sim card.
  • 3gs owners can ignore the previous bullet. You can swap sim cards later once you activate in iTunes normally.

Your selections will now install:

Step 6) When you are all done, load up blackr1n again and use the uninstall blackra1n to remove the blackra1n icon. It’s not needed any longer.
Step 7) Load Cydia, let it reorganize your apps, do the upgrades, and install your software!
Troubleshooting:
1) Blackra1n just crashes - You don’t have itunes 9 installed or your apple mobile device service is not running. Install itunes 9 or reboot to solve.
2) Blackra1n says it’s missing QTCF.dll. Put QTCF.dll into the same folder with blackra1n.exe and run it again.
3) Blackra1n hangs on running… - You need to kill iTunes and iTunesHelper.exe. This step should only take a couple seconds and something should happen.

Author: BigBoss

Install and Use SSH


SSH is one of the handiest tools ever ported for the iPhone. With SSH you can manage your phone, its files, and correct all sorts of problems. In short, everyone should have SSH installed and running. This guide explains how to install and some basic usage for SSH.
Open SSH can be installed via installer or Cydia. SSH is a launch daemon. This means you will not get any sort of configuration icon. To configure SSH, I recommend installing SBSettings. To install Open SSH and SBSettigns:
  1. Open Cydia. On the search tab, type in “Open SSH” and install Open SSH.
  2. Search for SBSettings, install SBSettings and restart springboard when prompted.
Neither SBSettings nor OpenSSH will put an icon on your desktop. To launch SBSettings just swipe the top task bar. One of the toggles within SBSettings allows you to toggle SSH on and off. We will use this to turn off SSH when not in use. We will also use SBSettings to obtain the phone’s IP address.
Now that SSH is installed, it’s time to try to connect to it. But before we do this, you may need some additional software. If you’re on a MAC, you will just run terminal. However, if you’re on a PC, you need to download two packages, WinSCP and putty. Neither of these programs require any sort of installation. They will just run from the downloaded executable file. Now to connect to the session:
On OSX:
  • Make sure phone is connected via wifi.
  • Open Terminal
  • Type ssh root@iphoneipaddress (substitute the iphone’s IP address for iphoneipaddress. Get this by opening SBSettings and looking at the “wifi” field. It is a number with 3 periods such as 10.2.2.24).
  • The password is “alpine” (without the quotes). (Note: on older systems before 1.1.1, the password is “dottie”.
  • It may take about 30 seconds on waiting for connect on the first time connecting.
  • Once you are in, you are at a Unix command prompt.
On Windows (using putty):
  • Open putty.exe
  • In “Host Name (or IP address) box, type in the phone’s IP address. (Get this by opening SBSettings and looking at the “wifi” field. It is a number with 3 periods such as 10.2.2.24).
  • Make sure connection type is “SSH”.
  • Click “Open”.
  • It may take about 30 seconds on “waiting for connect” on the first time connecting.
  • The username is “root” and the password is “alpine” (without the quotes). (Note, on older systems before 1.1.1, the password is “dottie”.
  • After this you mayget some warning about security key. Accept it to move forward.
  • Once you are in, you are at a Unix command prompt.
On Windows (using WinSCP). WinSCP is more for file copying than issuing commands although you can also issue commands. WinSCP may be good for copying ROMs onto the phone or managing the file system.
  • Open WinSCP.exe
  • In “Host name” box, type in the phone’s IP address. (Get this by opening BossPrefs and looking at the “wifi” field. It is a number with 3 periods such as 10.2.2.24).
  • In “User name” type “root”
  • In “Password” type “alpine”
  • Make sure “File Protocol” type is “SCP”.
  • Click “Login”.
  • It may take about 30-60 seconds on “waiting for connect” on the first time connecting.
  • After this you mayget some warning about security key. Accept it to move forward.
  • Once you are in, you will see a file browse box that looks something like the picture below.

The left side shows your local files and the right side shows your files on the phone. The yellow items are folders and the white items are files. Let’s say you wanted to add some ROMs to the path: /var/mobile/Media/ROMs/GBA. Let’s also say that hte ROMs folder does not yet exist. Here are the steps to navigate the right side on the phone to that folder:
  1. Double click the “..” until you are at the / folder. In the example above, this would be 3 times. You are starting in /private/var/root. The first double click of “..” puts you in /private/var. The next double click puts you in “/private”, and the next double click puts you in /.
  2. Double click “var”
  3. Double click “mobile”
  4. Double click “Media”
  5. Right click in the right pane on some free section and select “New, then Directory” (or just press F7). Give the directory the name “ROMs” (capitals count exactly as shown). If ROMs already exists, skip this step.
  6. Now double click “ROMs”
  7. Right click again and select “New, then directory”. This time name it “GBA”.
  8. Doubleclick “GBA”.
  9. Now on the left side, navigate to where you have stored your ROMs on your PC
  10. Drag the files you want from the left side (your pc) to the right side (your phone).
  11. When the copying has completed, you have now got ROMs on your phone.
  12. To delete the ROMs, follow all the same steps but instead of dragging the files over, just delete them on the right side (highlight and tap the delete key).
You should use putty when you need to type commands in and winscp when you need to manage files.

Author: BigBoss

Using BossPrefs

BossPrefs is a flexible toggle tool that lets you toggle any preference that you can toggle using a term program. It has a very powerful plug-in interface that lets you create a plug-in to handle any toggle. It should be the fastest loading services type app out because it grabs status asynchronously while the app is initializing rather than waiting on status from each plug-in before displaying the app window.
It also has the ability to add icons to its internal dock (that scrolls) to allow you to move all your settings types apps into one place. As of 1.56, BossPrefs does not auto hide icons so use Poof / Customize to hide the icons you add to the dock.

BossPrefs toggles come in one of two ways. Either the toggle is built into the app (edge, Bluetooth, wifi etc) or it is provided by an external plug-in. BossPrefs has a configuration screen that lets you toggle whether or not to display any of the built in toggles. But the plug-ins cannot be taken off the toggle screen. To remove the plug-in toggles, uninstall them.

Adding new toggles is not that difficult. But you must first know how to enable/disable the item you want to toggle in the term window. BossPrefs provides a GUI interface to allow you to add new toggles via the GUI Window. Basic toggle additions can be done via the GUI, but more complicated ones will require scripts to be written. First, let’s create a simple toggle via the GUI to restart springboard.
Load the configuration screen, select add, and you are presented with this screen:

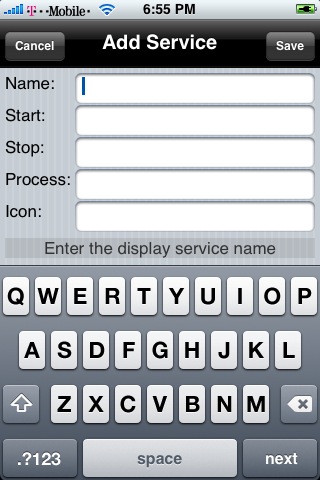
Now we will type in the settings. In this case, I will call it “Respring”. The only command I need is to kill the springboard using “killall SpringBoard”. Killall is a BSD command in /usr/bin. I do not need a stop command since I’m not really starting a service. And I don’t need a command to detect if the process is running because springboard is always running. Therefore, I’ll put “asdf” or some garbage in those lines. I’ll leave the icon blank since I don’t have one. Here is my finished ReSpring screen:

And when I click save, I now have “ReSpring” added to my list of toggles:

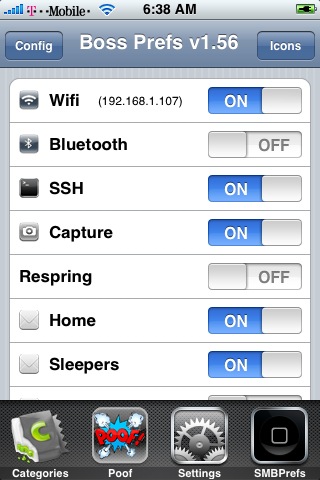
When I toggle this, springboard resets. It works!
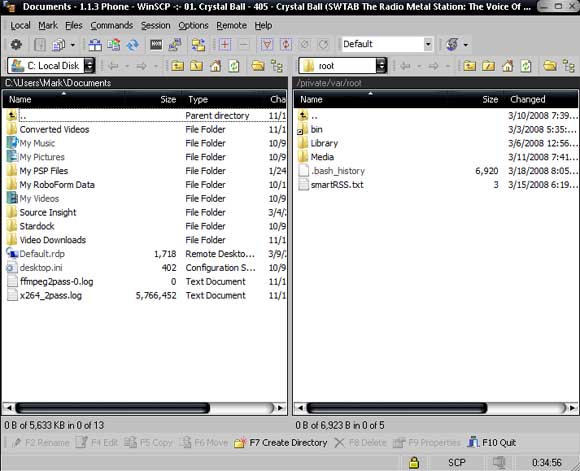
Now lets take a look at making a more complicated plug-in. For this, we will need to SSH into the iPhone. Take a look in /Applications/BossPrefs.app dir. You see two dirs there: services and scripts. Services is the directory where you put new toggles. This is done by making a new text file. The name of the text file is the name of the toggle. For this example, let’s install the BossPrefs capture control within installer. So, go do that then return to this tutorial.
Now, inside the services directory, you should see a file called “Capture”. Lets open that file. You will see the following:

/bin/launchctl load -w /Library/LaunchDaemons/com.digitalagua.capture.plist
/bin/launchctl unload -w /Library/LaunchDaemons/com.digitalagua.capture.plist
ScreenGrab
/Applications/BossPrefs.app/capture.png
These are 4 lines of text that correspond with the 4 entries in the GUI in order.
The first line is the command to type to start the toggle. This can be a single command issued or a bash script that you write for a more complicated start/stop. If you write a bash script, you can put this script into the scripts folder.
The second line is the command to type to stop the toggle. Just like above, this can be one command or a series of commands in a bash script.
The third line is how to determine whether or not the toggle is on or off for state. This is the trickiest line. There are three possibilities for this line.
  • Plist Identifier - If it is a plist identifier format (example: com.digitalagua.capture.plist), it will be piped to launchctl list.
  • Exist - If line 3 starts with the word “exist”, then it will use existence of a file on disk as the “ON” state, and if the file does not exist, the plug-in is “OFF”. This is how the safari download plug-in works.
  • Process - If neither of the above is the case, the string in line 3 is piped to ps -au command and looked for in a grep of such command. This is how you can determine if a binary is running on the system.
  • cmd - As of BossPrefs 1.57 and newer, you can use a script of your choosing to determine if the toggle is running or not. Just put “cmd yourscript params” where yourscript and params is the path and filename of your script and params are the parameters to pass. For example, I modified Capture plug-in to use this: “cmd ps au | grep ScreenGrab >> /dev/null”. If the script returns 0, the toggle is considered running. If it returns anything else, it is considered not running.
The 4th line is the optional path to the icon to display. The icon should be a 20 x 20 png file.
For the next example, lets take a look at the safari download plug-in. This is a bit tricky. The plug-in is enabled (ON) when some files are copied into place and is disabled (OFF) when those files are deleted. The toggle just moves those files to another folder to disable the plug-in and moves them back to enable it. Here is the SafariDL file from the services folder:

/Applications/BossPrefs.app/scripts/SafariDLStart.sh
/Applications/BossPrefs.app/scripts/SafariDLStop.sh
exist /System/Library/Internet Plug-Ins/File Download Plugin.webplugin/LCDownloader
/Applications/BossPrefs.app/safaridl.png
Notice that the first two lines are scripts. This is the contents of the SafariDLStart.sh script:
#!/bin/sh
cp -r /var/mobile/Library/BossPrefs/webplugin /System/Library/Internet\ Plug-Ins/File\ Download\ Plugin.webplugin
rm -rf /var/mobile/Library/BossPrefs/webplugin
cp /var/mobile/Library/BossPrefs/enabled.plist /System/Library/Internet\ Plug-Ins/QuickTime\ Plugin.webplugin/enabled.plist
rm -f /var/mobile/Library/BossPrefs/enabled.plist
cp /var/mobile/Library/BossPrefs/disabled.plist /System/Library/Internet\ Plug-Ins/QuickTime\ Plugin.webplugin/disabled.plist
rm -f /var/mobile/Library/BossPrefs/disabled.plist
/usr/bin/killall MobileSafari
Also, we are using the existence of LCDownloader to determine if the plug-in is enabled or disabled.
Troubleshooting:
On 1.1.3/4 the troubleshooting is especially tricky because the plug-in actually runs as user mobile. You may need to add the +s attribute and set the owner to root to the start/stop type scripts in the scripts folder to allow it to run with root permissions.
You can test your scripts in SSH but make sure you run them as user mobile.

DFU(Device Firmware Upgrade) Mode


DFU (Device Firmware Upgrade) mode is not the same as restore mode. DFU mode bypasses the current OS installed and allows you to upgrade or downgrade your OS. If you are getting errors trying to restore in iTunes, DFU mode is very likely for you.


DFU mode is not recovery mode. Recovery mode has a picture that says connect to iTunes. In DFU mode, the iPhone screen backlight is not even on and the display is blank. If you have anything on your display you are not in DFU mode.
This is how to achieve DFU mode. You can do it on every phone:
Method 1)
  • Attach the phone to the pc
  • Turn the phone off
  • Hold power and home together for *exactly* 10 seconds
  • Release power but keep holding home until the pc beeps as a USB device is recognized.
  • At no point will the display come on. Now your restore should work.
Having problems? Try adjusting the 10 seconds to be slightly less like 9 seconds, then 8, then 7. It’s a tricky timing but you will eventually get it.
Method 2)
  • Hook up the phone powered on to the PC
  • Now hold home / power until the phone turns off and keep holding for 10 seconds. If the phone ever turns on during this phase,start over and hold for less time.
  • Now release power and continue holding home until the PC recognizes the phone.
  • I don’t like this method as much because there are “rumors” that it may cause some 1604 errors in the restore. I am not convinced of that though.
Method 3)
  • Attach the phone to the pc
  • Turn the phone off
  • Press and hold power. Keep holding power. As soon as you see display on the screen of any sort press and hold home.
  • Hold power and home together for *exactly* 10 seconds
  • Release power but keep holding home until the pc beeps as a USB device is recognized.
  • At no point will the display come on. Now your restore should work.
Having problems? Try adjusting the 10 seconds to be slightly less like 9 seconds, then 8, then 7. It’s a tricky timing but you will eventually get it.
Have MAC OSX 10.5.6 or aMAC Book slim? You have a problem entering DFU mode. Here is an easy fix from the dev-team blog:
  1. You will need an account with ADC (Apple Developer Connection) this is free and takes a few minutes to sign up, you should read the terms and conditions carefully and you should only sign up if you are thinking of developing applications in the future - http://developer.apple.com/mac/
  2. Download the disk image “IOUSBFamily Log release for Mac OS X 10.5.5 Build 9F33” (yes, that is a “5” in 10.5.5 - this is a developer debug package of the USB kernel extension).
  3. Install IOUSBFamily-315.4.1.pkg from within the disk image
  4. Reboot your system!
Author: BigBoss

How To Restore iPhone To Factory State


There are times when things may go wrong with the phone or touch and you may need to restore the device to factory settings and start over. This guide explains how to restore the phone to factory settings using iTunes.


Note: You need itunes 7.4 or greater for FW versions 1.1.1 and 1.1.2. You need 7.5 or greater for 1.1.3 and 1.1.4.
Note: If you intend to jailbreak to install 3rd party apps, prior to restoring, be sure that the firmware version you are using can be hacked.
  1. Dock phone on PC and load iTunes.
  2. Once iTunes recognizes the phone, select the phone
  3. Click the restore button and agree to the prompts. iTunes will download the latest firmware and restore your device.
Note: if you need to restore a specific version of firmware onto your device, rather than click restore, hold shift (PC) or option (MAC) and click restore. This will bring up a browse box where you can select the firmware you wish to program.
Troubleshooting:
If you have any problems with the restore, try using DFU mode. This will often result in a working restore.
Error 1011, 1013, 1015 at the end of restore: This means that the modem firmware could not be updated. If you are performing a downgrade (1.1.4 to 1.1.3, for example), this is normal. You will need to use a tool like independence (MAC) or jailbreak 1.1.2 (PC) to boot the phone out of recovery mode then your downgrade should be completed. If your phone says “needs repair” and you tried to restore and got this error, you probably have a permanently damaged phone. You can try the DFU mode suggestion above and hope for the best.
Error 1602, 1603: This is somewhat of an unknown error. It usually means the PC lost communications with the phone. A reboot may fix it or restarting the apple mobile device service. You may need to reinstall iTunes. In some cases it can be more serious and may require Apple support. You may get lucky if you try to restore without a sim card inserted. (Remove simcard, reboot phone into restore mode, then try again).
Error 1600: On OSX, try mkdir ~/Library/iTunes/”Device Support”. If that directory is already there, try removing any files in it.
Error 1604: Apple wrote an article on this: http://support.apple.com/kb/TS1458
Error 1, 2, 3, 6 or some low number <>: This means the phone could not be put into restore mode. Manually place the phone into DFU mode and try again.

Author: BigBoss

iPhone Tips and Tricks


1) Get URL Hints

In Safari, you can press and hold any links in order to see the URL and site name of the link.

2) Dismiss Keyboard Suggested Word

To dismiss the keyboard suggested spelling of a word, you can tap on anywhere of the screen. You do not have to press “x” button at the end of the word.

3) Scroll to the Top of the Page

When you are using iPhone applications, you can automatically scroll to the top of the page by tapping on the “top bar”, which has the time, service bars and the battery information. In Safari, this will also brings up the URL address bar as well.

4) Different Domain Suffix

Hold down the “.com” button, you can see a popup comes up with “.net, .edu and .org” buttons. Slide your finger from them and then release your finger to choose.

5) Domain Resolution

When typing a URL in Safari, you don’t have to type the “www” or the “.com”. For exmaple, you can type “iPhoneToolbox” in the URL box in order to view “iPhoneToolbox.com”.

6) Take Screenshots Anytime

You can take any screenshots at anytime easily on your iPhone. First of all, press and hold the “Home” button and then click the “Sleep” button once. The screen will flash white and the screenshot will be stored in your camera roll immediately.

7) Save Images in Safari

When you are browsing any web pages on Safari. You simply touch the image and hold your finger until a menu show up, select Save Image.The downloaded image is located under your Photo / Camera Roll.

8 ) Inserting a Period

When you are typing on you iPhone, simply double tapping the “Space Bar” button at the end of a sentence, it will automatically insert a period followed by a space. It saves you a lot of time instead of pressing “124″ to get the numbers and symbols page where the period located in.

9) Alternative Way to Navigate Screens

You can tab the bottom right or left corner to switch between different screens instead of swiping your finger across the screen.

10) Alternate Characters

Hold down a letter on the keyboard, you can see popup comes up with various versions of the character.

11) Move Dock Icons

Just press and hold any icons on the screen, then drag them while they are shaking. You can put any 4 icons on your dock (grey bar at the bottom of your iPhone).

12) Fit-to-page Column, word and Picture

When browsing web pages on Safari, you can double tap on a column, word or picture to fit it’s width to your iPhone’s screen.

13) Select Icon for Bookmarked Webpage

When you are browsing a web page on Safari and add its icon to your home screen by pressing the “+” button and select “Add to Home Screen”. The icon is a screenshot of the page you were on. You can have a different icon by zooming in a particular item on the page. It can be the website’s logo or any picture.

14) Scrolling with Two Fingers

Some web pages contains separate text boxes with their own scroll bars. If you are trying to move around in one, you can scroll it with two fingers instead of one. That will let you scroll just inside the box and not affect the position of the entire page.

15) Maximize Battery Life

There is a separate sensor situated right above the earpiece, that detects ambient light. The iPhone uses this sensor only once per session, just as you unlock the handset. But if you cover the sensor as you unlock the phone, you will trikc the handset into thinking it’s in a dark room, and it will power down the screen brightness. You can Also turn off Bluetooth and WiFi if you don’t expect to use them for a while. You can also set email fetch time to “Hourly” or “Manually”, and turn the “Push” off in order to save energy.

16) Reset Your iPhone

Press and hold the “Home” Button and the “Sleep” Button to Reset your iPhone. A white light will flash, the screen will shut off and then turn back on. Please keep holding both buttons until the screen turns back on.

17) Insert Punctuation Quickly

To enter any punctuations while using iPhone keyboard, you can press and hold the “123″ button and slide your finger over to any punctuation button. And then the punctuation will be inserted after you have released the button.

18) Get a Bigger Keyboard

When you are using the on-screen keyboard on Safari, you can rotate the iPhone horizontally before tapping on the address bar, the Safari window will switch to horizontal mode. Now you can have a much larger keyboard, making data entry a little easier.

19) Changing iPod Icons

By the default, the buttons at the bottom of the iPod scren are “Playlists”, “Artists”, “Songs”, “Videos”, and “More”. You can change them by pressing the “More” button, and then tap on the “Edit” button in the upper left corner. A Configure screen will appear with icons for “Albums”, “Podcasts”, “Audiobooks”, “Genres”, “Composers”, “Compilations”, “Playlists”, “Artists”, “Songs”, and “Videos”. To substitute one of these icons for one that appears at the bottom of the iPod screen, just tap and hold on the icon you prefer and drag it over the icon you want to replace. Tap on Done when you’re finished.

20) Make a Call from Safari

If you find any phone numbers in Safari you would like to call, you do not need to jump to the phone component. Just tap on the number, and the iPhone will dial it for you immediately.

Related Posts Plugin for WordPress, Blogger...
Twitter Delicious Facebook Digg Stumbleupon Favorites More