

Open SSH can be installed via installer or Cydia. SSH is a launch daemon. This means you will not get any sort of configuration icon. To configure SSH, I recommend installing SBSettings. To install Open SSH and SBSettigns:
Now that SSH is installed, it’s time to try to connect to it. But before we do this, you may need some additional software. If you’re on a MAC, you will just run terminal. However, if you’re on a PC, you need to download two packages, WinSCP and putty. Neither of these programs require any sort of installation. They will just run from the downloaded executable file. Now to connect to the session:
On OSX:
The left side shows your local files and the right side shows your files on the phone. The yellow items are folders and the white items are files. Let’s say you wanted to add some ROMs to the path: /var/mobile/Media/ROMs/GBA. Let’s also say that hte ROMs folder does not yet exist. Here are the steps to navigate the right side on the phone to that folder:
Author: BigBoss
- Open Cydia. On the search tab, type in “Open SSH” and install Open SSH.
- Search for SBSettings, install SBSettings and restart springboard when prompted.
Now that SSH is installed, it’s time to try to connect to it. But before we do this, you may need some additional software. If you’re on a MAC, you will just run terminal. However, if you’re on a PC, you need to download two packages, WinSCP and putty. Neither of these programs require any sort of installation. They will just run from the downloaded executable file. Now to connect to the session:
On OSX:
- Make sure phone is connected via wifi.
- Open Terminal
- Type ssh root@iphoneipaddress (substitute the iphone’s IP address for iphoneipaddress. Get this by opening SBSettings and looking at the “wifi” field. It is a number with 3 periods such as 10.2.2.24).
- The password is “alpine” (without the quotes). (Note: on older systems before 1.1.1, the password is “dottie”.
- It may take about 30 seconds on waiting for connect on the first time connecting.
- Once you are in, you are at a Unix command prompt.
- Open putty.exe
- In “Host Name (or IP address) box, type in the phone’s IP address. (Get this by opening SBSettings and looking at the “wifi” field. It is a number with 3 periods such as 10.2.2.24).
- Make sure connection type is “SSH”.
- Click “Open”.
- It may take about 30 seconds on “waiting for connect” on the first time connecting.
- The username is “root” and the password is “alpine” (without the quotes). (Note, on older systems before 1.1.1, the password is “dottie”.
- After this you mayget some warning about security key. Accept it to move forward.
- Once you are in, you are at a Unix command prompt.
- Open WinSCP.exe
- In “Host name” box, type in the phone’s IP address. (Get this by opening BossPrefs and looking at the “wifi” field. It is a number with 3 periods such as 10.2.2.24).
- In “User name” type “root”
- In “Password” type “alpine”
- Make sure “File Protocol” type is “SCP”.
- Click “Login”.
- It may take about 30-60 seconds on “waiting for connect” on the first time connecting.
- After this you mayget some warning about security key. Accept it to move forward.
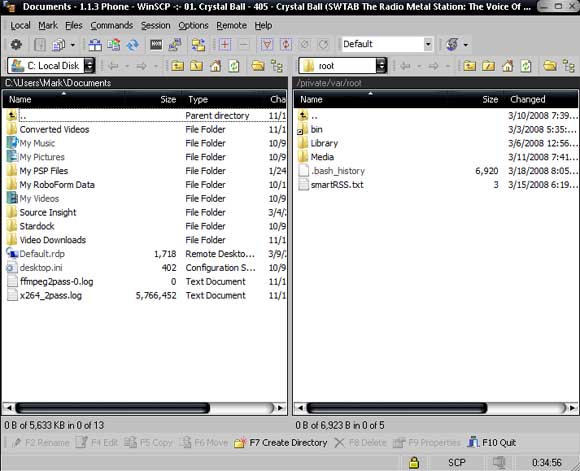
- Once you are in, you will see a file browse box that looks something like the picture below.
The left side shows your local files and the right side shows your files on the phone. The yellow items are folders and the white items are files. Let’s say you wanted to add some ROMs to the path: /var/mobile/Media/ROMs/GBA. Let’s also say that hte ROMs folder does not yet exist. Here are the steps to navigate the right side on the phone to that folder:
- Double click the “..” until you are at the / folder. In the example above, this would be 3 times. You are starting in /private/var/root. The first double click of “..” puts you in /private/var. The next double click puts you in “/private”, and the next double click puts you in /.
- Double click “var”
- Double click “mobile”
- Double click “Media”
- Right click in the right pane on some free section and select “New, then Directory” (or just press F7). Give the directory the name “ROMs” (capitals count exactly as shown). If ROMs already exists, skip this step.
- Now double click “ROMs”
- Right click again and select “New, then directory”. This time name it “GBA”.
- Doubleclick “GBA”.
- Now on the left side, navigate to where you have stored your ROMs on your PC
- Drag the files you want from the left side (your pc) to the right side (your phone).
- When the copying has completed, you have now got ROMs on your phone.
- To delete the ROMs, follow all the same steps but instead of dragging the files over, just delete them on the right side (highlight and tap the delete key).
Author: BigBoss


0 comments:
Post a Comment