

Note 3gs users: If you have a week 41 or newer iPhone you will only be able to have a tethered jailbreak. This means if you have to reboot your iPhone or turn it off then turn it back on (a full reboot, not just standby), you have to rerun blackra1n. You won’t lose all your settings or apps, but you will have to do this everytime you boot. So if you’re iPhone is newer, do not reboot your iPhone for no reason. You can determine your week based on your serial number in settings, general, about. Look the 3rd, 4th, and 5th digits. If it is larger than 940 you will have a tethered jailbreak only.
Note #2 3gs users (take this seriously): Get your shsh stored into cydia ASAP. And make open SSH the first thing you install once you are jailbroken. Do not restore to 3.1.3 under any circumstances. Even if you are not jailbroken, fix your hosts file on all the computers you may ever restore on to use saurik’s server (http://www.saurik.com/id/12#howto). These things are to prevent being in a situation where you cant jailbreak anymore.
Updated for RC3 and sn0w unlock. Screenshots only updated where required.
Geohot has released blackra1n. This is a 3.1.2 jailbreak for all devices: iphone 2g, iphone 3g, iphone 3gs, ipodtouch 1, 2, 3 (note: ipod touch 3 8gb users say this isnt working). It’s pretty easy. You just load the app and click the “make it ra1n” button and follow the prompts. Unfortunately, the ipod 3 and any iphone 3gs after week 41 is tethered which means if you reboot you have to run blackra1n again. (Note for iphone 3gs owners, check your week by looking at the 4 and 5th digits of your serial number).
As of RC3 you can now unlock your 3.1.2 iPhone with the sn0w option!
From geohot: So, what is blackra1n? blackra1n is a 30 second ALL device 3.1.2 jailbreak. Even the ipt3, but the ipt3 is tethered. In order to boot it, just rerun blackra1n. As far as donations go, they are much appreciated, but not until after blackra1n works for you.
To use: load the app and follow the prompts. It’s pretty simple. If you have problems, see troubleshooting section below the last step of the tutorial.
Step 1) Install blackra1n and iTunes 9 or newer.
Step 2) Close itunes and kill iTunesHelper.exe in taskmanager.
Step 3) Attach your device to your computer using the cable, and run blackra1n. You see this:
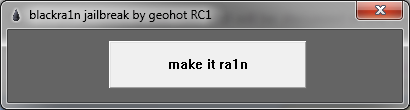
Step 4a) Hit the “make it ra1n” button. You will see this:
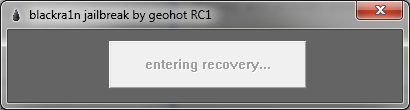
and this

and finally this. This step should only take a couple seconds. If it hangs on running you have itunes helper still running.
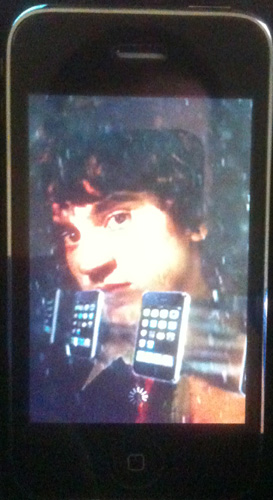
Step 4b) Now, watch your iPhone. It will soon show this. When it reboots it is done:
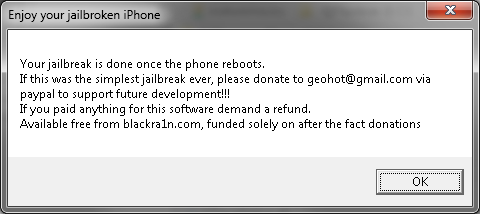
Step 5) Now the jailbreak is done, it’s time to install cydia.
Note: There is plenty of discussion on whats better between cydia, icy, and rock app. I can tell you that Cydia is strongly recommended even if you don’t want to use it. It does everything right and installs a proper BSD base. Rock app is flashy and cool also. The jailbreak install of Rock does not install rock extensions so it is ok to install. The icy install is broken on this jailbreak (version RC1). At this time, I recommend not installing it. It does not get installed with super user permissions and cannot install software properly.
EDIT: ABSOLUTELY DO NOT INSTALL Icy. (Icy removed from RC3 so RC3 users can ignore this). It overwrites dpkg especially if you install it last. Result will be you cannot install mobilesubstrate or anything that depends on it (libhide, sbsettings, categories, etc). This is because a bad Icy bundle was used.
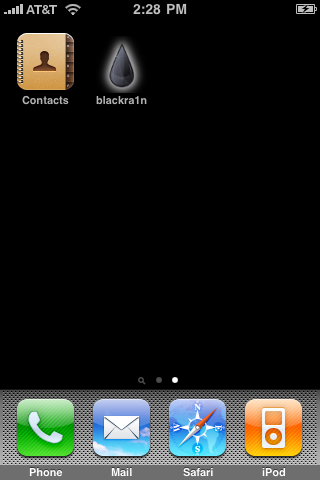
On your device you now have a new icon:
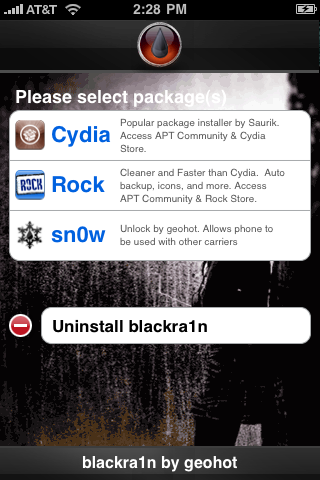
Load this app and select your installer preferences. Remember, we are not skipping cydia, install Rock App if you want also. If you need to unlock, select Sn0w. If you do not need to unlock do not select sn0w.
Note: If you have not activated your device in iTunes, blackra1n will hactivate it for you. If you have a contract carrier, this will not work unless you also unlock. Unlock and hactivation must go together or you will get no service. Here are some rules:
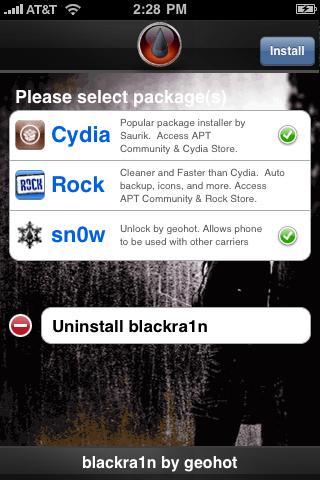
Your selections will now install:


Step 6) When you are all done, load up blackr1n again and use the uninstall blackra1n to remove the blackra1n icon. It’s not needed any longer.
Step 7) Load Cydia, let it reorganize your apps, do the upgrades, and install your software!
Troubleshooting:
1) Blackra1n just crashes - You don’t have itunes 9 installed or your apple mobile device service is not running. Install itunes 9 or reboot to solve.
2) Blackra1n says it’s missing QTCF.dll. Put QTCF.dll into the same folder with blackra1n.exe and run it again.
3) Blackra1n hangs on running… - You need to kill iTunes and iTunesHelper.exe. This step should only take a couple seconds and something should happen.
Author: BigBoss
Note #2 3gs users (take this seriously): Get your shsh stored into cydia ASAP. And make open SSH the first thing you install once you are jailbroken. Do not restore to 3.1.3 under any circumstances. Even if you are not jailbroken, fix your hosts file on all the computers you may ever restore on to use saurik’s server (http://www.saurik.com/id/12#howto). These things are to prevent being in a situation where you cant jailbreak anymore.
Updated for RC3 and sn0w unlock. Screenshots only updated where required.
Geohot has released blackra1n. This is a 3.1.2 jailbreak for all devices: iphone 2g, iphone 3g, iphone 3gs, ipodtouch 1, 2, 3 (note: ipod touch 3 8gb users say this isnt working). It’s pretty easy. You just load the app and click the “make it ra1n” button and follow the prompts. Unfortunately, the ipod 3 and any iphone 3gs after week 41 is tethered which means if you reboot you have to run blackra1n again. (Note for iphone 3gs owners, check your week by looking at the 4 and 5th digits of your serial number).
As of RC3 you can now unlock your 3.1.2 iPhone with the sn0w option!
From geohot: So, what is blackra1n? blackra1n is a 30 second ALL device 3.1.2 jailbreak. Even the ipt3, but the ipt3 is tethered. In order to boot it, just rerun blackra1n. As far as donations go, they are much appreciated, but not until after blackra1n works for you.
To use: load the app and follow the prompts. It’s pretty simple. If you have problems, see troubleshooting section below the last step of the tutorial.
Step 1) Install blackra1n and iTunes 9 or newer.
Step 2) Close itunes and kill iTunesHelper.exe in taskmanager.
Step 3) Attach your device to your computer using the cable, and run blackra1n. You see this:
Step 4a) Hit the “make it ra1n” button. You will see this:
and this
and finally this. This step should only take a couple seconds. If it hangs on running you have itunes helper still running.
Step 4b) Now, watch your iPhone. It will soon show this. When it reboots it is done:
Step 5) Now the jailbreak is done, it’s time to install cydia.
Note: There is plenty of discussion on whats better between cydia, icy, and rock app. I can tell you that Cydia is strongly recommended even if you don’t want to use it. It does everything right and installs a proper BSD base. Rock app is flashy and cool also. The jailbreak install of Rock does not install rock extensions so it is ok to install. The icy install is broken on this jailbreak (version RC1). At this time, I recommend not installing it. It does not get installed with super user permissions and cannot install software properly.
EDIT: ABSOLUTELY DO NOT INSTALL Icy. (Icy removed from RC3 so RC3 users can ignore this). It overwrites dpkg especially if you install it last. Result will be you cannot install mobilesubstrate or anything that depends on it (libhide, sbsettings, categories, etc). This is because a bad Icy bundle was used.
On your device you now have a new icon:
Load this app and select your installer preferences. Remember, we are not skipping cydia, install Rock App if you want also. If you need to unlock, select Sn0w. If you do not need to unlock do not select sn0w.
Note: If you have not activated your device in iTunes, blackra1n will hactivate it for you. If you have a contract carrier, this will not work unless you also unlock. Unlock and hactivation must go together or you will get no service. Here are some rules:
- If you have activated in iTunes before running blackra1n and have service, you should not select sn0w.
- If you did not activate in iTunes, blackra1n will hactivate for you. You will not get service via a contract carrier or not without unlocking at this stage. Select Sn0w.
- If you have a 3g (not a 3gs, but a 3g): If you do not need to unlock now but think you may travel and want to unlock “next month” or something, you should hactivate and unlock by installing sn0w. If you have already activated in iTunes (you have your carrier signal and icons in springboard) you probably need to restore and start over without your sim card inserted. Restore in iTunes, run blackra1n, and select sn0w and let it do the hactivation and unlock. Then insert your carrier sim card.
- 3gs owners can ignore the previous bullet. You can swap sim cards later once you activate in iTunes normally.
Your selections will now install:
Step 6) When you are all done, load up blackr1n again and use the uninstall blackra1n to remove the blackra1n icon. It’s not needed any longer.
Step 7) Load Cydia, let it reorganize your apps, do the upgrades, and install your software!
Troubleshooting:
1) Blackra1n just crashes - You don’t have itunes 9 installed or your apple mobile device service is not running. Install itunes 9 or reboot to solve.
2) Blackra1n says it’s missing QTCF.dll. Put QTCF.dll into the same folder with blackra1n.exe and run it again.
3) Blackra1n hangs on running… - You need to kill iTunes and iTunesHelper.exe. This step should only take a couple seconds and something should happen.
Author: BigBoss


0 comments:
Post a Comment